Thursday, April 21, 2011

Thursday: Orange Beef

One of the things that I did not consider when I came up with this "eat-at-home" theme for April was that Neil and the kids would be on vacation this week. We have eaten out for lunch and eaten leftovers for dinner a few times this week. Last night, Neil and I went out for a few hours (love the built-in babysitter!). We had Legal Sea Food, which is my favorite restaurant in Boston. After eating salads twice on Monday, twice on Tuesday, and for lunch on Wednesday, I was ready for something delicious. Legal does Fish and Chips like no one else. They also make onion rings like Luther's used to in Houston. These are the only kind of onion rings I will eat: thinly sliced and almost falling apart. I cannot stand thick huge slabs of onion. Anyway, dinner with Neil and a much-needed walk around the outdoor shopping center afterward were wonderful. I was excited to find the next book in one of my favorite series, but also sad at the same time because it is the last book in the series. After ten books, that is the equivalent of the end of Harry Potter to me.

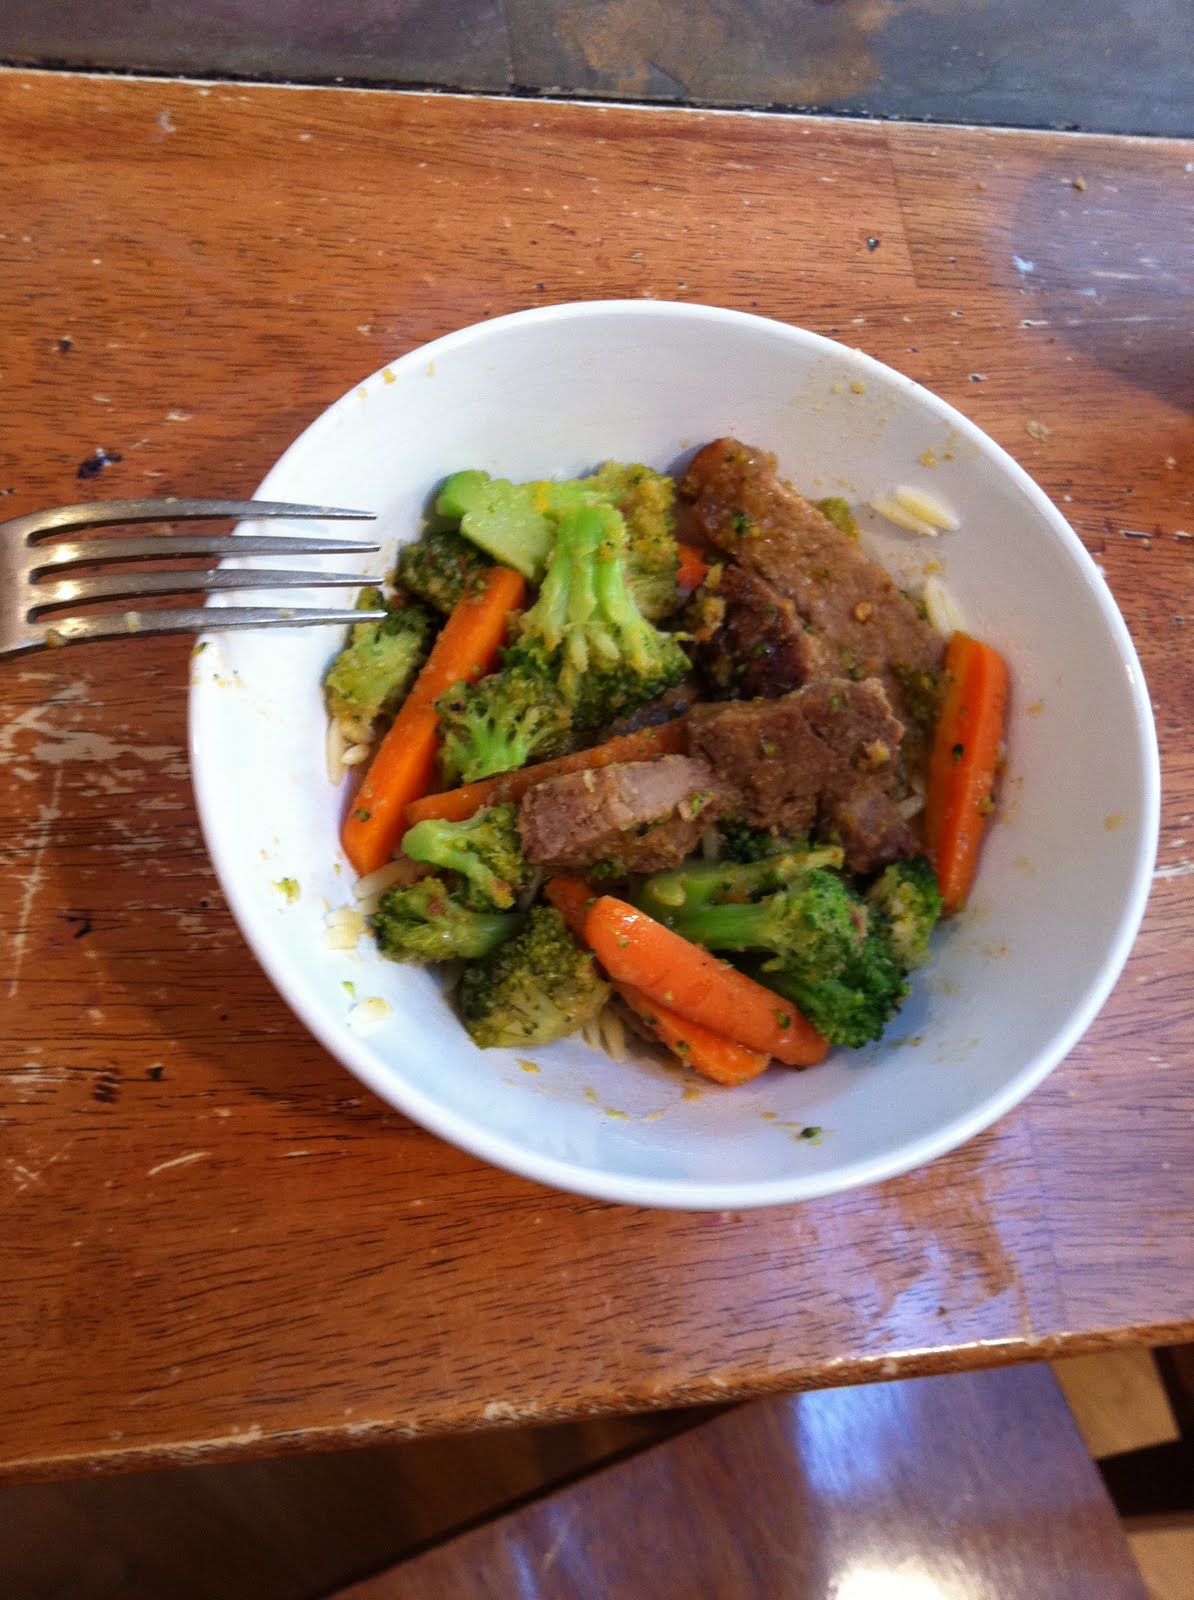
I was ready to cook again tonight! My kids all loved the dinner and wanted their pictures taken. On a side note, it is amazing how the quality of light is different for the same room, but different seats at the table. This is probably my most successful Double Delicious meal to date. Yay! Re-heating the steak from Sunday night's dinner was a great idea. Neil's mad grill skills made for some incredibly tender meat! I will definitely make this again, and next time I will use the ingredients actually called for instead of what I had in my fridge. The one thing I would change was that I used frozen broccoli. I have been spoiled by using the fresh broccoli florets from Cost-co. This broccoli was a little mushy by the time it defrosted and cooked instead of nice and crisp.


Orange Beef, Jessica Seinfeld
Double Delicious, pg 78, with my adaptations

1 1/2 sirloin steak, sliced vertically into thin slices and then sliced horizontally to make it look more like stir-fry beef
1 t cornstarch
1/2 t pepper
2 T grapeseed oil
2 T reduced-sodium soy sauce
1 small can mandarin oranges, pureed in a small food processor
NOTE: you will only use 1/2 c of this puree that is really more like thick orange juice
1/4 c warm water
1/2 c cauliflower puree
1 T brown sugar
1/4 t ground ginger
1/4 t chili pepper
1/4 t garlic powder
1 1/2 c baby carrots, sliced length wise a few times
broccoli florets, enough to fill the pan

1. Heat the oil in a skillet or wok over high heat and then carefully add the meat. Cook until done, maybe 7 or 8 minutes. I did not keep the heat on high. I turned it down so that it wouldn't over cook the meat and become tough. Stir frequently. Transfer to paper towel to drain. Our meat was already seasoned, so I did not season it. If it had not been, I would have at least seasoned it in salt, pepper, and garlic.

2. In a separate bowl, combine the soy sauce, oranges, water, cauliflower puree, brown sugar, ginger, chili, garlic, and as much salt and pepper as you would like. (I have decided that one of the problems with this cook book is that they do not add any salt or pepper. I don't usually add very much to my cooking, but everything needs a little flavor...) Add 1 teaspoon of cornstarch and whisk until smooth.

3. In the same pan, add a little oil to cover the bottom, and saute the carrots and broccoli, stirring frequently. I think this might be between 1-4 minutes. I wanted the carrots softened, but the broccoli crisper. Push the vegetables out of the middle, add the soy sauce mixture, and bring the sauce to a boil. Then add the beef to the pan and coat with the sauce. Cook 1-2 minutes more, until the sauce thickens. Serve immediately.

4. Meanwhile, bring water to boil in a 2 qt saucepan. When the water boils, add 1 1/2 c orzo pasta. ( I only used 1 cup, and barely had enough to feed everyone.) Stir until the water boils again, and then turn down the heat to 6-7 to keep it from boiling over. Boil for 7 minutes and drain immediately.

5. Layer orzo, vegetables, and beef in each bowl. Spoon a little sauce from the bottom of the pan over the top of each bowl.

The recipe calls for 1/2 cup of 100% orange juice, but I used the mandarin oranges because I didn't have any OJ. Another change would be to use sweet potato puree, which is what the recipe called for, instead of the cauliflower puree. I didn't notice the cauliflower taste, at all, but the color of the sweet potato lends itself to the orange sauce. You could garnish the food with small orange slices, rind on, and thinly sliced green onion. If you like to zest things, you can add the zest of 1 orange to the soy sauce mix. Who has time to zest? Not me. Overall, I cannot wait to make this recipe again! If I were in a hurry, I would definitely just stir fry the meat in the morning, and then reheat it in the evening. This is a much healthier version of Mandarin Beef that Neil likes to order at our new favorite Chinese food restaurant.

Monday, April 18, 2011

Monday and Tuesday: leftovers

I know that I said I never serve leftovers because, with very few exceptions, I do not like eating them. But tonight we had leftover pizza from Ainsley's party and leftover fajitas from lunch. The grilled chicken salad I had for lunch came with so much chicken that I brought it home for another salad tonight. Neil and the kids ate the leftover pizza.

We also have leftover steak and potatoes from last night, but I am not sure what to do with the steak. It is not enough to feed the whole family. I had originally thought that I would slice it thin and put it over a salad. But after two salads with grilled meat, that doesn't sound quite so yummy. As I type, I am reminded that I am supposed to be serving Orange Beef for dinner one night this week. I will make the steak fit that recipe...

Today is Patriots' Day here in the birthplace of the Revolution. It is the anniversary of the "Shot heard 'round the world." We watched the Boston Marathon with a bunch of friends. It was a beautiful day!

Today we met our Texas friends in the North End for some Italian food. Boston's North End is where the Italians settled in Boston so long ago. Again I had a grilled chicken salad, that happened to be very good, and we have leftover pizza and pasta. So, dinner will again be leftovers. Lucky for me!

Saturday, April 16, 2011

The Menu, Week III

Sunday, 4/17 Beef-steak on the grill, roast baby new potatoes, Cost-co Grand Parisian salad and vegetable (either green beans or broccoli)


Monday 4/18 Chicken-bbq chicken salad: I do not have a recipe for this, but I am going to cook the chicken on low in the crockpot, all day, covered in bbq sauce. Then I am going to serve it over a classic green salad with carrots, cucumber, and celery. For the kids I will probably put it on a slider bun (a smaller version of a hamburger bun) and serve it with carrots and ranch. I'll let you know how it turns out.


Tuesday 4/19 Fish-grilled, sauteed broccoli, salad and Orzo


Wednesday 4/20 Soup-butternut tomato soup, a Double Delicious recipe, and Rachel Ray breadsticks


Thursday 4/21 Beef-orange beef with stir fry vegetables and rice (another Double Delicious recipe-if I'm still talking to Jessica Seinfeld after Wednesday night. I have to say that I have not been super impressed with her recipes. I love the puree idea, and might consider putting spinach puree in the bbq sauce on Monday, but I'm not in love with her food.)


Friday 4/22 Vegetarian-pumpkin ravioli, roast asparagus, salad, fruit and carrots for the kids (Again, this is conditional on the success of the other Seinfeld recipes this week. I happen to love pumpkin ravioli, so we will see.) Either way, we need to eat a vegetarian meal to add some balance to the force.


Saturday 4/23 Sammy Nite-Pampered Chef wraps. This is my go-to recipe for lunch parties. Pampered Chef recipes are similar to Martha Stewart in that they always work out and taste amazing. While I do not order or make Antipasti platters in any sense of the word, these Antipasti Wraps are amazing. They have a full range of colors and various textures and flavors. They are time intensive to make, as far as sammies go, but well worth it. These are a good thing to have as leftovers or when friends come over, or to take half to a friend who recently had a baby, because you will want to use all of the ingredients up. Or at least I never have use for olives, sun dried tomatoes, etc, after I make these wraps. At this point, I am not sure what I am going to serve these with. A salad with lite-Italian dressing or a balsamic. Chips and fruit? I'll think about it. If you have any suggestions, let me know.


Easter: I am still considering what to serve for Easter dinner. Right now I have fish planned, with Gorgonzola Gnocchi, and some kind of vegetable, but I'm not sold on that. Please make comments here or on my FB page about what you traditionally eat for Easter dinner. I'd love some great ideas!

Ainsley's 10th Birthday: Icecream Sundae Bar tips

I think Ainsley had a fun birthday weekend. We had a wonderful dinner at the Cheesecake Factory, and the girls loved their Reese's Peanut Butter Cup Chocolate Cake Cheesecake for dessert. The waiters sang to Ainsley, and this was a new experience for her. They also wrote her name in chocolate around the rim of her plate.

Audrey decided yesterday that she was Ainsley's "best sister" and that Ainsley was her "sweetest sister." When we went shopping for Ainsley's bday present at the American Girl Store, Audrey was very good at keeping the secret from Ainsley. She was so excited about buying Ainsley gifts and told me that she wanted to buy Ainsley a "stuffie." What she really meant was that she wanted to build a Build-a-Bear and give it to Ainsley. We compromised, and Audrey got to pick out a mini-BaB Lamb instead. It was the cheapest stuffed animal I have ever bought, in terms of quality, but Audrey was so happy to give it a "bath" and brush it for Ainsley and then to watch her open it.

It was also nice to watch Audrey and Ainsley strolling around holding hands all evening. Audrey picked out her outfit for Ainsley's birthday dinner, and Ainsley has been planning her outfit for weeks.

The kids and Neil spent this morning cleaning the house for Ainsley's party tonight. Ainsley invited a few friends from church and school over for dinner, a movie, and ice cream sundaes. The girls had a fun time with their friends. Neil and I were thankful for a finished basement with a door on it.

This is why we created "Cuzcotopia." That is the name we have given our finished basement/media room. If you have seen Disney's "The Emperor's New Groove", then you will recognize the reference. We've got the Kinect down there, a 50" flat screen, a 3-ft circumference Fuf beanbag, two ottomans, two gamer chairs that you are like rocking chairs that sit on the floor and balance, and a mini-fridge. We miss Deb's playroom from our house in Fayetteville, but this is still pretty fun. We are trying to find either a Foosball table or an air hockey table on Craigslist to put in the back of the room, too. You'd be surprised how many there are on Craigslist, but they sell pretty fast.

My cooking tip for today is for an ice cream sundae bar. I scooped the ice cream in advance, when it was softened from the car ride home, so that it would be faster when it was time to serve it at the party. I tried two different methods.
1) Place wax paper on a cookie sheet. Scoop the ice cream in rows on the cookie sheet. You have to move fast so it does not melt all over the cookie sheet. Place the cookie sheet flat in the freezer until it is time to eat it, a few hours at least.
2) Place the scoops in the individual muffin spots in a muffin tin. Place the muffin tin flat in the freezer.

When it was time to serve it, I took both pans out of the freezer at the same time. When the ice cream was still hard, it was easier to use a spatula to pry the ice cream off the cookie sheet. When I finished that tray, I moved on to the muffin tin. The ice cream was softer, but not softened. It was easy to spoon the scoop out of the muffin tin in one piece. When it was hard, the ice cream in the muffin tins was difficult to scoop out-it was just like trying to scoop ice cream. Have I mentioned that one of my biggest pet peeves in life is scooping ice cream. That is why I tried this trick.

For the toppings, I used cupcake liners and filled them half way with either Plain M&Ms, gummy bears, or gummy worms. I filled it full of Oreos that I had placed in a ziplock and crushed with the end of my rolling pin. I didn't want crumbs, but really chunky pieces of Oreo. Everyone could pick Oreos or M&Ms and gummy bears or worms. Not one of every thing. Ainsley poured the Magic Shell.

For the movie, I took party hats from the store, inverted them in Easter baskets on the kitchen table, and filled them with Trader Joe's White Cheese popcorn. Smartfood Popcorn would work, too. Martha Stewart always suggests making these cute paper cones for holding party treats, but who has time for that? Party hats work just as well. If you are germaphobic, you could put a bright napkin inside and then put the popcorn inside that. For the movie candy, we bought 9 oz clear plastic cups and allowed them to choose some candy.

We spread the food out over the course of the evening, and offered lots of cold water to dilute all of that sugar and salt. I tried to control the portions of the food so that they really were not eating much at one time. For example, I gave everyone one piece of pizza cut in half lengthwise so that it looked like they were having two pieces. Only a few people wanted more, and they only ate another half a slice. I was not being stingy-I had four large pizzas-but I knew how many treats they would be eating later. Interestingly, but not surprisingly, only two girls took me up on the baby carrots that I offered.

My kids are very excited because we have two pizzas left over, a lot of candy and Sprite, plus the cheesecake and leftovers from Friday night. We are going to have to lock the kitchen down so that they don't spoil their dinner tomorrow night. After two days off, and Neil grilling steaks again tomorrow night, I will be ready to cook again Monday night. (And go to the gym twice to make up for all this food and no gym time this weekend.) I was pleasantly surprised when Neil asked me to make those baby new potatoes again for dinner tomorrow night.

Thursday, April 14, 2011

Thursday: Meatball Subs

Okay, so this isn't a picture of a meatball sub. But I happen to love this cute pink flowers. I could decorate all my girls' rooms exclusively in these flowers.

Meatball subs are the easiest, yummiest dinner around.

1. Start with a bag of mini-meatballs from anywhere. I used a bag from Trader Joes mixed with one from Target because that's what I had in my freezer. HEB sells them, too.
2.
Place enough meatballs to fill your sandwiches in a large saucepan. I used large sub rolls tonight, and I planned on 8 mini-meatballs per sandwich. I don't think we used that many, though.
3. Then pour your favorite pasta sauce or marinara sauce over all the meatballs. You want enough to cover all the meatballs and a little extra to make sure you can spoon some over the top of the meatballs in the sandwich. I added 1/2 cup carrot puree to the pasta sauce. And I usually add Italian seasoning mix to the sauce. I think you could even add some defrosted frozen spinach. Turn the heat up to medium until the pasta sauce starts to bubble. Then turn it down to low.
4. We cut the rolls lengthwise and then in half. Neil scooped out the insides of the rolls to make space for the meatballs. We added reduced-fat mozarella cheese.

There are actual instructions on the bags of mini-meatballs that you should follow if this is too vague for you. I thought all the kids would eat half a sandwich, but they ate more than that. This is difficult with very young kids because they might let the meatballs drop out the bottom.

I served the subs with a salad for Neil and me. For the kids, I sliced a pear. Again, little baskets make it seem like we are at a restaurant. I am sure you are wondering about the kinds of restaurants that we take our kids to if eating out of a basket is such a huge deal. You will understand when you have four kids to feed at a restaurant. Or when you live in Boston. It's one of those things where if you have to ask how expensive a restaurant is, you can't afford to eat there. So we make sure our kids think red plastic baskets are cool.

I am looking forward to eating out tomorrow night! I will have gone two full weeks cooking dinner even though meatball subs are so easy they barely count.

Wednesday: Golden Corn Chowder

I love making corn chowder. We have a "Midwestern Corn Chowder" that contains loads of Cracker Barrel sharp cheddar, shredded. It is perfect for a winter evening. In fact, we make it every year with the McMullin's in the week between Christmas and New Year's. The version I made last night, is much lighter and better for warmer weather. My favorite thing to do when making soup is to buy the little plastic container of pre-diced onions in the refrigerated section. Sometimes if I'm lucky, I'll find it with onions, celery, and carrots layered. That saves so much time! It's worth the extra money.
1 T butter
1/2 c finely diced onion
1 clove garlic, finely diced
1/2 c finely diced celery
1/4 c finely diced carrot
1 T flour
2 15-oz cans corn
1 c potatoes, diced into 1/4" cubes
1 12-oz can evaporated skim milk
1/2 c cauliflower puree
salt
pepper
shredded cheese to garnish

Melt butter over medium heat. Add onion, garlic, celery, and carrot. Stir until veggies are soft but not brown, about 5 minutes. Add flour and continue stirring until well blended. Add 1 can of corn, with its liquid. Add half the liquid from the second can of corn. Put remaining corn and liquid in a food processor. Pulse until crushed. Add to saucepan; stir in potatoes. Add the cauliflower puree. Increase heat to medium high. Season with salt and pepper to your liking. Cover and bring soup to a boil, stirring occasionally, until potatoes are tender, about 5 minutes. Remove from heat. I used a hand blender to make it creamier. Another thought is to use 1 can of cream corn and 1 can of whole-kernel corn and forgo the food processor. Stir in evaporated milk and serve. Garnish each bowl with shredded cheese.

The key to the potatoes is to slice the potato, puncture them, and then microwave them for two minutes to soften them. When it is time to cube the potatoes, use this cool hand-powered tool. You can find it here. I use it to chop onions, green peppers, potatoes, and all kinds of vegetables. It works best if you cut the vegetable into manageable slices, take the skins of onions, and then get to it. I do this because I do not like thick chunks of undercooked potato in my soup. You do the potato however you prefer.

Wednesday, April 13, 2011

Tuesday night: Orzo Risotto with Chicken

Last night I made a Double Delicious recipe called Chicken Orzo. It is a variation of chicken and rice that is supposedly more healthy. Let's just say that when you add orzo (which is my new favorite pasta) to shredded chicken, cream cheese, pureed cauliflower, onions, lemon juice and shredded Parmesan, you get a bunch of white food mixed together. It was so unappetizing. I dumped my steamed diced carrots and green peas over the top of it and it was still bland. The recipe did call for "sweet paprika" whatever that is. I tossed some regular paprika in, like the instructions said, and it turned the chicken pink-ish. The kids enjoyed it, but it was too sweet and, yet, too bland for me. Here is how I will make it next time. If you make it first, let me know how it turns out.

1 1/2 cup orzo, dry
3 chicken breasts, marinated in Lite Italian dressing (Pour enough to rub in the chicken and sit in the dressing), thinly sliced
1/2 t salt
1/4 t garlic
1 garlic clove, crushed and diced very finely
1/4 package dry Italian dressing mix
3 T grapeseed oil, divided
1 cup cauliflower puree
1/2 cup diced onion
1/2 c healthy chicken broth
1 package frozen broccoli florets or however much fresh broccoli cuts your family will eat (I fill the skillet with broccoli-that's how much we eat.)
1 cup reduced-fat shredded cheddar cheese (we don't need it to melt...)
1/4 c reduced-fat cream cheese, cut into cubes

1. Cook the orzo 5 minutes less than the package instructions. Drain and set aside.
2. Sprinkle the chicken breasts with salt and pepper. Heat 1 T of oil in a large skillet over high heat. Add the chicken and cook 3-6 minutes each side, until it is no longer pink on the inside. Remove to a cutting board. When the chicken is cool to the touch, shred it with a fork and knife or cut it into chunks. Set aside.
3. In the same skillet, add the remaining oil to the skillet and place over medium heat. Add the onions and garlic. Cook until the onions begin to soften but not brown. Add the broccoli and cook over medium high heat, maybe a 7, until the broccoli is bright green, stirring constantly. Stir in the orzo, chicken, broth, cauliflower puree. Add the dry Italian dressing mix, shredded cheese and cream cheese, stirring until the cream cheese melts completely and the mixture is creamy. Note: You could even mix the cream cheese, shredded cheese, cauliflower puree, chicken broth and dry Italian dressing all together. Then add the orzo to that and mix together. Then add the chicken. Finally, add all of that to the skillet. Then stir to incorporate the broccoli into the mix. I think that is what I would do. Season with salt and pepper to your liking.

I would serve this with a salad and maybe fruit for my kids.

Misc tips:

The key to defrosting a puree is to leave it in the fridge all day. If you forget to do that, fill a bowl with hot water and place the baggie of puree inside. It will defrost quickly. And I love pre-diced onion that you find at the grocery store. What a time saver! No pics tonight-sorry-it was just too lame to take a picture of. And so dissatisfying. Maybe I will post another time about how the visuals of our meals stimulate our appetites. Oh, and I like orzo because it looks exactly like rice and takes 7 minutes to cook. That's much better than trying to cook rice and burning it like I did last week. I can't wait to use the orzo in another recipe. Maybe with sliced baby bella mushrooms and shredded monterrey jack cheese, salt and pepper, and a little evaporated skim milk to add moisture. Oh, and butter. And possibly a little diced green pepper and diced onion. If you make that, let me know how it tastes. That sounds much better than white pasta and white chicken and white onions and white cheese and white cream cheese. What happens if you have a white plate?

Monday, April 11, 2011

Homemade Pizza

Tonight was pizza night, and I decided to make homemade pizzas to go along with our theme of enjoying our meals around our table. I have much more control over what goes into our food when I prepare it. Having said that, there is something to be said for having some great Queso and having no idea what they put in it-I want to eat it in a warm flour tortilla, not marry it.

A funny story about pizza and me: I did not like pizza until I was 17. When I was in pre-k, I smelled a pizza scratch-n-sniff sticker and it made me sick to my stomach. Or it could be that I was already coming down with a stomach bug and the pizza sticker was an unlucky coincidence. Either way, I would not eat pizza for more than a decade. I finally caved when I was a lifeguard and my friends ordered some pizza from Little Caesar's. My lunch of a pear, pretzels, and half a sandwich did not smell as good as the pizza. There are days that I wish I never tried that pizza. And maybe chocolate chip cookies and donuts from Shipley's. And white queso. You get the picture.

I had never considered making my own pizza until Neil and I came to visit Boston last winter. Our new friends made four different homemade pizzas in our honor: pepperoni, cheese, bbq chicken, and pesto (maybe with chicken-I can't remember.) We were sold on the idea. I tried making my own pizza dough many times last spring. Let me tell you that I can make much better pizza dough than regular bread. My favorite pizza to make is a supreme pizza. I will include that "recipe" even though I do not make it often.

Fortunately for my lazy self, Trader Joe's has an amazing pre-made, refrigerated pizza dough for $.99. IMO, there is no reason for me to make pizza dough as long as I live in Needham. For those of you who do not live near a Trader Joe's, I'm sorry to tease you. I will post a pizza dough recipe another time. The key to the pizza is a Pampered Chef Pizza Stone or a generic pizza stone. I have one of each. I can tell a difference with the Pampered Chef stone vs our $5 generic stone, but not much of one. I made two pizzas and we have leftovers from that little amount.

Pizza:

1 Trader Joe's Whole Wheat pizza dough
1 TJ regular white pizza dough
1 jar TJ Pizza Sauce
1 bag part-skim mozzarella cheese
1 pkg pepperoni
flour, as needed
corn meal, as needed

1. Set the pizza dough on the counter, not near the oven, and set the timer for 15 min. Preheat the oven to 425F. Assemble your ingredients.
2. Place the pizza stone in the warm oven until the timer goes off for the dough. When the timer goes off, flour the counter top, put a little on your rolling pin, and roll out the pizza dough. Make sure to spread it fairly thin-1/2" thick, if possible. You may like to stretch the dough out with your knuckles, from the underside. This also gets rid of excess flour.
3. Sprinkle cornmeal on the warm pizza stone, lay the pizza on top, and put it in the oven for 4-6 minutes or until the dough bubbles a little.
4. When the timer goes off, take the pizza out, spread pizza sauce all over, making sure to leave a crust. Sprinkle heavily with cheese. Place pepperoni in a circle pattern on the pizza.
5. Bake the pizza for 4-6 more minutes, depending on the thickness of the pizza.

Options:
Cheese pizza: don't put any toppings on
Supreme pizza: canadian bacon, cut into triangles or small pieces, thinly sliced green peppers, thinly sliced mushrooms
BBQ pizza: spread bbq sauce on warm pizza instead of a tomato-based sauce. Sprinkle with mozzarella or monterrey jack cheese. sautee a chicken breast in grapeseed oil, slice into bite-size pieces and place on pizza. Sprinkle with more cheese.
Pesto pizza: spread pesto on warm pizza, top with mozzarella cheese and sliced chicken, if desired.

The children had crudite and ranch dressing. I made myself my favorite salad. I generally make this salad with feta cheese. Some people use goat cheese, but ew. No pun intended. I happened to have queso fresco leftover from the fish tacos, and it is now my favorite cheese. It is so creamy and goes so well with the sweet flavors in this salad. I'll probably never use feta again. Except for the next time that is all I have. And I only ever buy low-fat feta, just fyi.

romaine lettuce or fresh baby spinach, 1 cup
carrots and celery sliced, however much you like
1 large strawberry sliced
queso fresco, 1/2 ounce, crumbled
Ken's Fat-Free Raspberry Pecan Vinaigrette, 1-1.5 T

Toss the lettuce with the vegetables and strawberries. Toss with as little salad dressing as you can manage so that you won't wilt the lettuce. Use your fingers to crumble the queso fresco over the salad. Yum! If you have craisins and pecan or walnut pieces in your fridge, throw some in. I avoid cucumbers in this salad because they really soak up the pink dressing. So does the cheese, but it looks cool, and does not absorb it as quickly as the cucumbers do.

My final tip is for flouring a surface for pizza or sugar cookies. Place Gladwrap, sticky side down, on the counter, and sprinkle your flour on that. It's a much easier way, less messy, that actually using your counter top.

Sunday, April 10, 2011

Sunday Dinner: Steak, Roast Baby Potatoes, and Green Beans

Steaks: Neil is in charge of all grilling at our house.

USDA Choice Sirloin steaks, we use two for our family
grapeseed oil, 1-2 T
kosher salt
pepper
Mozambique Peri Peri Fire Rub
garlic
lime juice


Rub the meat with oil. Then sprinkle with however much seasoning you would like. The Peri Peri rub is spicy, so do not go heavy on that one. Let the meat marinate in that while the grill heats up. Heat the grill on high until 500F. Place the steak on the grill, sear for 3 minutes on each side. Drop temp to low. Neil says to listen to your spidey sense to know when to take the steaks off. We prefer Medium doneness and love to eat them right off the grill.

Roast Baby Potatoes:

I bought a tiny bag of baby red potatoes. Some of them were seriously only an inch in diameter. The largest ones were maybe two inches. I washed the potatoes, seasoned them and stuck them in the oven for 35 minutes. These were the instructions on the package and it was very easy to make. we put these in when we started the grill heating.

Grapeseed oil
Kosher salt
Pepper
Garlic

Preheat the oven to 425F. Rub the salt and pepper into the washed potatoes. Add the oil and garlic, and rub them in to the potatoes. Put them in a shallow baking dish to bake. I happened to use a pizza pan that has small holes in it, and it worked fine.

Green beans:

1 bag frozen green beans
chicken broth
3 slices of uncooked bacon
salt
pepper
garlic

I empty the bag of green beans into the crock pot, add enough water to go about half way up the beans, sprinkle salt, pepper, and garlic, and lay the bacon on top. If I had had already chopped onions, I would have added those, too. Cook them on low for at least 6 hours. Once I was close to the rest of dinner being done, then I turned it to "Keep warm." I remove the bacon before serving. The leftover broth is great to hold on to and use in another meal.

Apple Crisp and Ice-cream
by Pampered Chef

5 Granny Smith apples
1/2 pkg (9 ounces total) butter yellow cake mix
2 T sugar
1 T cinnamon
1/4 c butter, melted
Vanilla Ice cream

1. Preheat the oven to 350F. Use a Pampered Chef Apple Peeler/Corer/Slicer on all the apples. Cut apples in half. Place in the bottom of a 9X13 glass baking dish.
2. Combine cake mix, sugar, cinnamon, and butter in a large bowl. Mix with a fork or pastry blender until mixture is crumbly. Sprinkle evenly over the apples.
3. Bake 35 minutes. Serve warm over ice cream.

This is our absolute favorite dessert. Back in Ol' Army Days, Kendra made this for us. Neil fell in love with the Apple Peeler/Corer/Slicer. She gave it to him as a Christmas gift some time later. We make this at least once a month. We do not always cut the apples in half. We have made it with pre-sliced apples with skins on because they were fixing to go bad-it still worked. The key to making a crumbly top is to keep mixing with the forks until you can tell that it is done. We have leftovers on this dish, and that is fine. It would be nice to make two pie dishes of this and give one to a friend. When I've done that, I'll let you know how it turns out. Always use a light ice-cream with this rich dessert. I prefer Bluebell No Sugar Added Vanilla Bean. Or I did when I lived in Texas and could find Bluebell. Now I settle for Dryers...

None of the recipes tonight were very specific-sorry. Also, Kendra posted a comment about leftovers. We seriously do not have leftovers. I make just enough food for us to eat. We eat three chicken breasts or pork chops, two steaks. We don't usually have leftover vegetables, and not enough leftover rice or pasta to use. The dog eats all leftover vegetables as part of his "diet."

Saturday, April 9, 2011

Week 2 Menu

By the time we get to Ainsley's bday on Friday night, we will have gone two full weeks without eating out. In the spirit of full-disclosure, I did get Audrey pancakes from McDonald's one morning because I went to the gym early and did not realize she had not eaten breakfast. She was ready to eat by the time we left the gym at 10, that's for sure!


We were grateful beyond measure that the beltway crowd figured out a budget so that we would continue to get a paycheck. However, we would have been fine with a kitchen full of food and a good habit of eating around our table. We fought the desire to celebrate by going out on Saturday night. There are some peoples' homes that when you visit, you can tell that everyone loves to be there. That is a lofty goal, but that is a home we would love to create. Enjoyable meals are key to that dream. So are regular cleaning and organizing. Watch for those in future months.


Here is the menu for this week:


10th beef-steak, roast mini red potatoes, and green beans (dessert is apple crisp-our family favorite!)

11th pizza-homemade pizza, salad or crudite for the kids

12th soup-corn chowder and salad, breadsticks for the kids

13th chicken-orzo and chicken, salad

14th sammy nite-meatball subs, salad or crudite

15th out- Ainsley's 10th bday!!


Ainsley has requested the Cheesecake Factory as her family birthday dinner because she has heard how wonderful it is supposed to be. Neil and I do not eat there often, and I definitely am one of those people that think this is not a little kid restaurant. But it will be a big treat for her, and Syd is happy to go along. There is a quaint, but over-priced cupcake shop here in Needham. A few months ago, I bought a Groupon for 6 cupcakes. My plan is to take Ainsley to Treat after school on Friday to pick out 6 cupcakes for her "birthday cake" after dinner Friday night. (With so many birthdays in such a short time, we get tired of the same bday cake all the time.)


16th Turkey Ainsley's bday party: hot dogs, chips, and fruit (Turkey is not part of my normal meal menu pattern, but I happen to buy turkey hot dogs.)


We gave Ainsley the choice of a big bday party and a small gift or a small party and a bigger gift. Go figure on what she decided: 8 friends at our house for dinner, dessert and a movie. I managed to convince Ainsley that she would get more gifts if we did not take her 8 closest friends to Chili's for dinner, as she had previously requested. She has agreed to grilled hot dogs, potato chips, and fruit. For the ice cream sundae bar, we will use small bowls, one ice cream scoop, either a cookie or a small brownie, some magic shell, and two tablespoons of toppings. Then for the movie, we will have packed in advance some popcorn, candy, and chocolate covered pretzels in small containers for them to choose from.

Sammy Night: Burgers and Fries

One of our favorite places to eat in San Antonio was Bigz. They have great burgers, amazing homemade potato chips with a creamy dip, and Mexican Coke in a glass bottle. Who could ask for more? Except that they have a large, multilevel deck for outside dining and a huge field for playing soccer and running around. Right before we left SA, they began construction on a playground. We loved to head to the gym and then an early dinner where we ran into friends from school, church, and the neighborhood. Unfortunately, there was no place like that in Fayetteville and there is no place like that anywhere near Needham. The closest thing to a "burger joint" is called Wild Willy's and it is a horrible imitation of a Texas-style restaurant. So disappointing!

Instead of going out to grab burgers, we started buying fresh burgers from the butcher counter at the grocery store. We buy sliders for the younger two, regular hamburger patties for the girls, and Neil and I get a huge gourmet burger that either has pepper around the edge or green peppers and shredded cheese mixed in. We buy some nice rolls instead of the tiny store brand buns and nice sliced cheese. Tonight I ate a salad with my burger and I made sweet potato fries for everyone else. The seasoning was great, but they were super time intensive and hard to get consistently crunchy. I think it would be better to buy ready-made fries and add the seasoning.

Here are our Burger Nite tips:
  • Use Deli Thins for a bun. This is what I use so that I can trade the calories for a slice of cheese.
  • Buy White American Deli Classics sliced cheese or a sliced cheese tray from Costco. It is a lot of cheese, but if you make grilled cheese sandwiches, DIY Lunchables, and burgers it is a great deal.
  • Put the thicker patties on the grill first. Sliders and gourmet, or pub, burger patties are much thicker than the standard burger.
  • A healthy option, if everyone is having a burger, is a piece of grilled chicken breast on a deli thin. (Marinade: Use a little grapeseed oil to coat the chicken breast with your fingers and then rub in some Kosher salt and pepper. Or marinate it in light Italian dressing. Or oil and rub dry Italian dressing mix into the chicken.)
  • Neil likes to use a bag of lettuce shreds on his burger instead of one large piece of lettuce.
  • Serve your burgers and sides in a red plastic basket with wax paper or a colorful printed napkin. We have red baskets and bright blue baskets that I found at Target once upon a time. Eating out of these feels just like being at a restaurant.
  • If you forgo fries, a great salad for the burger is Catalina Salad. I've included that recipe as well because I love to make it on burger nite.
I am so excited about something new that I tried tonight. Back in San Antonio, another of Neil's favorite burger places was Gourmet Burger. Maybe he loved it because kids ate free every Wednesday; regardless, they made unconventional burgers-they had themes and a variety of topings. I decided to forgo mayo and ketchup tonight and replaced it with the broccoli slaw from the other night. (In case you don't remember, it was broccoli slaw mixed with sour cream and lime juice.) This time I added some Kosher salt and pepper. This was a good imitation of Gourmet Burger! I am going to eat my burgers like this from now on.

Baked Sweet Potato Fries by Paula Deen, with my changes
3 sweet potatoes (The recipe calls for 5, but I do not have a pan large enough to accommodate that many fries.)
Grapeseed Oil, enough for tossing the fries
House Seasoning (or salt, pepper, and garlic powder in a 4:1:1 ratio)

Preheat the oven to 450F. Line the pan with parchment paper. Peel the sweet potatoes. Slice them into 1/4-inch slices and then slice those slices into 1/4-inch slices again. (This sounds confusing, but you are making vertical slices into the potato and then taking each individual slice and cutting that into 1/4-in wide french fries by slicing vertically again.) Toss with grapeseed oil and sprinkle with seasoning. Lay on the pan, so that they are not "overcrowded" and not overlapping. (Thanks for being specific there, Paula.) Bake for 15-20 minutes, stirring at some point during cooking.

Catalina Salad, by Cindi Carr
Lettuce, washed, dried, and torn into bite-size pieces (use any kind you have in your fridge, romaine or a lettuce blend is fine)
Catalina salad dressing, reduced fat or reduced calorie is fine
Ranch style beans, 1 can (You will not use the entire can-eyeball how many beans you would like in your salad.)
Carrots, tomatoes, etc
Shredded cheese
Fritos (You won't use the entire bag either-just as many as you want.)

Mix the lettuce with whatever diced or sliced vegetables you normally add to a classic salad. Then add the Ranch beans, shredded cheese, and Fritos. I use a slotted spoon to add the beans so that I can add the right amount of beans and just the right amount of sauce-just a little. Add a few tablespoons of Catalina salad dressing. Toss to coat everything, adding more salad dressing as needed, a few tablespoons at a time. Yum! I realize that this is not specific either, but the amount of dressing depends on how many ingredients you add to the salad. However, if you add too much dressing, the salad will be soggy.

Friday, April 8, 2011

Trouble, or Mindy Taylor's Chocolate Chip Cookies

The failures of the past few days was starting to get to me. I can only eat 40 calorie bread sandwiches for so long before I crave something delicious and filling. And comforting. So, Audrey and I made chocolate chip cookies this morning. Such a mistake because I cannot even tell you how many I ate. Less than in this picture, but still more than the two I should have eaten.

Chocolate chip cookies are my trigger food. Do you have a trigger food? If you do not know what I am talking about, it is a food that if you eat one, you will eat a million and then move on to something else equally unhealthy. Fortunately, I do not have anything in my house that are equally unhealthy,except for single serving Cheetos. And those are not a temptation for me. I love them, but I'm not tempted by them.

When we were in medical school, we meaning Neil, I was still learning to cook. All of my friends were amazing cooks, so I asked them to teach me their recipes. These cookies came from Mindy Taylor, a girl whose friendship was so valuable at that stage in my life. I think of her every time I make these cookies. This is one of the few recipes that I can make without looking at the recipe, even though I still do. (Back in high school, my friend Nicole and I made cookies and mistook the amount of sugar for the amount of salt. Ever since then, I have been a measure twice, pour once kind of girl.)

Here are some things that are critical to the success of the cookies:
  • room temperature unsalted butter, use organic sugar (although the recipe does work well with Stevia, but that calls for half the amount in the recipe so check the bag)
  • use real butter or at least I Can't Believe It's Not Butter in a baking stick-don't use margarine (who uses margarine anymore? You should use I Can't Believe It's Not Better Light spread...)
  • you can use generic pudding mix, it won't make a difference, same with vanilla
  • make sure your baking soda is fresh
  • put the completed cookie dough in the fridge for at least a few minutes before you put it on the cookie sheet
  • be prepared to get your hands dirty: roll each cookie into a small ball, usually 1-2 inches in diameter because this makes such a beautiful cookie with beautiful edges
  • use a Silpat to keep the bottoms from browning before the rest of the cookie is done baking
  • please note that this cookie dough is better than Pillsbury or Toll-house slice-and-bake cookie doughs could ever dream of being. You will want to eat all of it. Allow a bite for checking that the salt is well-mixed, but that's it. There won't be any left for cookies otherwise.
  • add the flour a little at a time because if you add too much at once, the flour will fly everywhere (ask me how I know this)
  • buy the Butter Crisco in the bricks because you can just slice off the 1/4 c with a sharp knife, put the lid back on and go forward with the cookies. If you had to get a measuring cup, fill it with crisco, then scoop it out, then try to clean the measuring cup, you will hate making these cookies. (If you have to do it that way, make sure to use the 1/4 c to measure the flour and sugar first, into different bowls please, so that you can get the crisco last.)

2 1/4 c flour (I used unbleached white flour)
1 t baking soda
1 t salt
1 c packed brown sugar
1 (3.4 ou or larger) package instant vanilla pudding mix
3/4 c butter (1.5 sticks)
1/4 c Butter Crisco shortening
1/4 c white sugar
2 eggs
1 t vanilla
Preheat oven to 350F. Cream butters and sugars on 6 in your stand mixer. Add pudding. Add eggs and vanilla. Mix well. Separately mix flour, baking soda, and salt. Add the flour mixture by 1/2-1 c into the batter. Mix on low after each time you pour. When you are done adding all of the dry ingredients, turn the mixer up to 4 to really combine the cookie dough batter. Add however many chocolate chips, chocolate chunks, or milk choc chips as you want. I don't always use an entire bag. Sometimes I do. Cook on the prepared cookie sheet 10-12 minutes until the cookies are light brown.

Variations: Use Andes Mint Chips and then melt Andes mint chips over low heat on the stove until melted. Drizzle the melted Andes Mints over the warm cookies. Cool before eating.

BTW, Neil is on call tonight and I spent my afternoon studying, carpooling, debating on FB, and worrying about this govt shut-down. In other words, there was no way I was going to cook tonight. (I was even proud of myself for cooking last night because Zach got a stripe on his Ju-Jitsu belt and we always go to Chili's to celebrate. I stood up for eating at home, even though the kids were disappointed. I was more disappointed when my meal didn't turn out.) So tonight the kids ate Mickey shaped nuggets and green peas while I had a Lean Cuisine meal. Oh, and cookies.

Fettucine Alfredo from Rachel Ray

When you see this pic, you'll notice how few ingredients there are. You've got to love any recipe with so few ingredients, but, I discovered, that comes with a price.

One of my all-time favorite foods is the chicken parmesan with fettucine alfredo from Carabba's in Houston. And I mean the original Carabba's, not the chain that is owned by a relative of the Carabba's family. I have never found a restaurant with the same quality alfredo sauce and I can definitely not recreate this at home, so I rarely eat it.

Anyway, last week, I watched Rachel Ray while I was at the gym, and she made an alfredo sauce that incorporated saffron steeped in water instead of chicken broth. It looked so delicious and easy that I decided to try the recipe.

You will notice that I have no pictures of the final product because it was another total recipe fail. This time, I think the recipe was at fault. I read the reviews online and everyone had the same problem I did. It was edible but disappointing.

I was not willing to go to the effort to find the saffron because they didn't have it at my store. So I am to blame for messing with the master. I substituted chicken broth, which I think was fine, but the saffron must have added flavor that was now missing. I added italian seasoning, salt and pepper, and garlic powder. It was still bland. To save dishes, I threw my sauteed broccoli into the serving dish with the pasta.

I won't even post the recipe because you should not make it. The problem that I, and all the other reviewers had, that did not happen to her Italian highness, was that the shredded parmesan cheese clumped together. I tried the Digiorno kind, which is less expensive, as well as a more expensive kind, and they both clumped as they melted. It was disgusting to pick out the clumps from the pasta as I stirred it. It filled a two cup measuring cup with clumped white cheese and some butter or grease that had separated at the bottom. Ew.

I was doubly disappointed because I was hungry all day, but knew that I was having pasta for dinner, so I held off. I guess it was good for my waistline, but I am starting to crave something good and that's always trouble. (As in refer to my next post.)

Wednesday, April 6, 2011

Orange Glazed Pork and Rice Pilaf

Tonight I made two recipes from Double Delicious by Jessica Seinfeld, Orange-Glazed Pork and Rice Pilaf. I took quite a bit of license with the pork recipe and totally failed on the rice because I kept the heat too high. Bummer.

The orange pork called for pork tenderloin, which is a cut of meat that I love. Unfortunately, all I had were thin pork chops. Cooking pork tenderloin is vastly different, so I skipped an entire part of the process. The recipe says to sear the meat on both sides in a frying pan of hot oil and then to put the meat and the glaze in the oven to finish cooking.

Instead, I seared the meat on both sides, over med-high heat, then added the glaze, and cooked it on low for just a few minutes. The glaze calls for freshly chopped ginger and garlic. I used powdered ginger and fresh garlic. I chopped the garlic into small pieces because that was the wording in the recipe. Next time I would chop that garlic as small as I could get it or use refrigerated minced garlic that comes in a jar. I just cannot stand seeing garlic in the food I eat-yuck. The ground cayenne pepper was given a range instead of a definite measurement. I used a little less than the bottom measure, and it was still spicy. However, it was not too spicy for me or the kids. All in all, the glaze was incredibly flavorful.

The rice pilaf calls for a cauliflower puree to add creaminess without calories and fat. In order to accommodate a full head of fresh cauliflower, I used both the glass dish and the steamer bag. Again, the steamer bag provided better results. I fit 3/4 of a head of cauliflower in one bag. The full head yielded 4-1/2 cup servings. There was very little salt and pepper called for in the rice, so I would add more before serving.


Orange-Glazed Pork, p 84
(This is the recipe with my changes added)
GLAZE
3 T orange marmalade (when am I going to use this again?)
1/2 c water
1/2 c carrot puree
1 T reduced-sodium soy sauce
1/4 t ground ginger
2 t apple cider vinegar
2 cloves garlic, finely minced
1/2 t cinnamon
1/4 t ground cayenne

PORK
4 pork cutlets
1/2 t salt
1/4 t pepper
1 T grapeseed oil

1. In a small saucepan, whisk all ingredients for the glaze until smooth. Warm the glaze over medium heat until it begins to bubble. Cook 10-15 minutes more, until the liquid is reduced by one quarter and the glaze thickens.
2.Meanwhile, sprinkle the pork cutlets with salt and pepper. Heat the grapeseed oil in a large skillet over high heat. Carefully add the pork and cook for 2 minutes per side, turning once until both sides are brown.
3. Off the heat, add the glaze to the skillet. Turn the pork once to coat in the glaze. Return the skillet to low heat and cook for a few more minutes on each side. Be careful not to overcook the pork, check often, so that your meat will remain moist. Remove the pork to a cutting board and stir the glaze until smooth. Slice the pork and serve with the glaze.

Rice Pilaf, p 113
2 cloves garlic, minced 1/2 c cauliflower puree
1 t grapeseed oil 1-1/2 c chicken broth
1 c rice 1/4 t salt

1. In a large saucepan, saute the garlic in the grapeseed oil until it just begins to turn golden on the edges. Add the uncooked rice and toss to coat, approximately 30 seconds.
2. Add the cauliflower puree, chicken broth, and salt. Cover and bring to a boil. Turn the heat to low and cook with the lid tightly in place approximately 45 minutes. DO NOT STIR when it is done.
3. Take the rice off the heat and let stand for 5 minutes. Fluff with a fork and serve.

The original recipe says to turn down the heat on the rice to a simmer. For those of us who haven't been to culinary school, that's not very precise. Or, she says, cook it until it is tender. I'm not sure how to tell that with the lid tightly down and without letting the steam out. Please post any helpful comments on how to figure this out! While I totally failed on this rice, I will try both of these recipes again, using a piece of tenderloin and keeping the rice on low heat. I served this with green peas and a salad for myself. In an attempt to help the rice, I added some glaze to the rice. It didn't help, but does spread the color around the plate, I guess.

Tuesday, April 5, 2011

Fish Tacos

Tonight's dinner was fish tacos served on corn tortillas with black beans, broccoli slaw, queso fresco, and a little cilantro. I have never made or eaten fish tacos, but have loved the idea of them. I chose a Martha Stewart recipe to adapt because her recipes tend to work well: if you follow the instructions, everything turns out right.

I chose to use tilapia because it is fairly mild and it was on sale; however, the recipe calls for any firm white fish. Conversely, I saw other recipes for fish tacos that called for fish that flaked easily. I bought a pound of tilapia fillets today so they would be as fresh as possible, and we ate all but a quarter cup of the cooked fish. The New Englander in me prefers to buy fish that was caught the same morning that I bought it. The recipe also called for thinly shredded red cabbage, but I chose a small bag of broccoli slaw. That is something else that I have always wanted to cook with, but for which I could never find a use. This is much faster than trying to shred cabbage and changes the visual effect of the tacos from a reddish purple accent to a green accent. Again, in my opinion, this is a matter of preference that will not adversely affect the taste of the tacos.

I chose to to cut the tilapia strips in half horizontally because corn tortillas are tiny. In addition, I cook with grapeseed oil instead of olive oil. This recipe did not call for cheese, but what Mexican food is complete without some queso? I bought queso fresco for the first time, and it was perfect crumbled in the tacos. Finally, I used green onions because the produce guy at the store said they were the same as scallions. And I used about half of what was called for. If I had sliced them thinner, I would have used more.


While the fish was cooking, Sydney heated the tortillas on a griddle pan over medium heat. This pic shows a flour tortilla that I used to make a quesadilla for Audrey. While the second batch of fish cooked, I drained the already-cooked fish on a plate covered with a paper towel. The thinner slices of fish in the second batch did not need 5 minutes on each side. Another tip is to pause between batches to replenish the oil in the pan and to let it heat up. In order to use the queso fresco, cut a few cubes and then crush them between your fingers over your taco. Finally, I took the one long half of the jalapeno that was for cooking the fish, and cut it lengthwise into three slices. I thought it might spread the jalapeno wealth throughout the pan.

As soon as the fish was done, we loaded up each taco with broccoli slaw, fish, black beans, crumbled queso fresco, and a little cilantro. I think you could easily put finely diced tomatoes, too. Another good addition would be thinly sliced cucumbers that have been marinated in lime, olive oil, and sugar. (I will find a recipe for you because these cucumbers are divine.) While Freebirds taught me the value of rice in a burrito, this meal does not need it in order to be filling. We chose to have some pineapple chunks on the side of our tacos. I do not like spicy food, and this was not spicy at all. In fact, if you like spicier food, you might consider using a spicier pepper or keeping some seeds in your jalapenos. Coarse salt and ground pepper are called for without specific measures, so I was heavy with the pepper and sparing with the salt. I rubbed the salt and pepper into the fish instead of just sprinkling it over the fish. If you like salty food, add more salt to the fish or to the broccoli slaw mix. Overall, I loved my first fish tacos! The girls ate them, but I did not require Zach and Audrey to because I was not sure how spicy it would be. Next time I will serve it to them.

1/4 c reduced-fat sour cream
2 T lime juice
Coarse salt and ground pepper
2 1/2 c broccoli slaw mix
1/2 c thinly sliced green onion
1 jalapeno, halved lengthwise, one half minced
2 T grapeseed oil
1 lb tilapia fillets, cut into 16 equal strips
enough corn tortillas for your family, around 8
1/8 c fresh cilantro, finely chopped

1. In a bowl, combine sour cream and lime juice; season with salt and pepper. Transfer half the mixture to another small container; set aside for serving. Toss cabbage, green onions, and minced jalapeno with the remaining sour cream mixture. Season again with salt and pepper.

2. In a large skillet, heat oil and remaining jalapeno over med-high heat, making sure to coat the bottom of the pan. Season fish on both sides with salt and pepper. In two batches (starting with larger pieces) cook fish until golden brown on all sides, 5-6 min. Discard jalapeno.

3. Meanwhile warm tortillas and black beans, according to package directions.

4. Fill tacos with slaw, fish, black beans, queso fresco, and cilantro. Garnish with drizzled sour cream mixture. Serve immediately. (The pic is from my leftovers and I did not have any extra sour cream.)

Find the recipe at www.marthastewart.com/262267/fish-tacos

Monday, April 4, 2011

Lemon Chicken and Broccoli Gratin

My recipe for tonight is Lemon Chicken, Broccoli Gratin, salad and fruit. Whenever I put fruit in the menu, it is for the kids and substitutes for a carb in their meal. Tonight's dinner is brought to us by Jessica Seinfeld's Double Delicious. It is the sequal to her Deceptively Delicious cookbook. In case you are not familiar with these cookbooks, the basis for all of her recipes are sneaky vegetable purees.

How to make a Carrot Puree: These are my version of the instructions, inspired by pgs. 193-196 of the cookbook. I tried two different methods to determine the best one for me.


Option #1: Steamer Bag
1. Buy Ziplock brand steamable microwave bags.
2. Lay the bag horizontally, filling to the top line with baby carrots, making sure that they lay flat instead of piled on top of each other.
3. Follow the cooking and safety instructions on the bag.
4. Place the cooked carrots in the food processor, without any water. Turn on the blender and blend maybe two minutes, until the carrots are a nice and creamy puree.


Option #2: Glass dish
1. Cut the ends off of the carrot, cut full-size carrots into 3-inch chunks or cut baby carrots in half.
2. Place in a glass or ceramic microwaveable dish, with 2 T water, and cover loosely with saran wrap. You are supposed to use one pound, but I just filled the dish I had.
3. Cook in one-minute increments until the carrots are tender.
4. Place the cooked carrots in the food processor, with the water from the baking dish. Turn on the blender and blend two or more minutes, until the carrots are a nice
and creamy puree.


Opinion:
Method # 1--Cutting the carrots obviously takes more time as does checking the microwave every minute during cooking. The puree was less creamy and took longer to make than the carrots from the steamer bag. The glass dish carrots yielded three 1/2 cup portions.

Method #2--The steamer bag yielded only two 1/2 cup portions, but it took less time to puree and the puree was creamier and a lighter orange color. I put each 1/2 cup serving into a snack size ziplock bag.

I froze the ones I will not use tonight. When it is time to add the puree to the recipe, snip a corner of the baggie with scissors and squeeze the puree likes it is frosting.

Pinch Hitting: Recipe Substitutions


The lemon chicken recipe (p. 56) calls for whole-wheat flour. I happen to stock unbleached white flour, so I will substitute this in equal parts. I have carrots and not cauliflower, so I am substituting carrot puree for the cauliflower puree. I will let you know how it turns out and if I think the carrot influences the flavor of the chicken.

Cauliflower gratin is the original recipe included in the cookbook (p. 114) and served with the lemon chicken. I buy the huge bags of fresh broccoli florets at Cost-Co because my kids and the dog happen to love sauteed broccoli. I substituted frozen broccoli florets for the cauliflower tonight, but I think fresh broccoli florets would hold their shape better than frozen.

I also use Grapeseed Oil instead of Olive Oil. For this kind of cooking, they are interchangeable. I also only cook with boneless, skinless chicken breasts. I am publishing the recipes with the changes that I made.


The verdict: My kids loved the broccoli and I loved the chicken. I was the only one who knew there were carrots in the dishes, and I was the only one who could taste them.

Tips: I butterflied the chicken breasts to make cutlets and then made them into smaller pieces. I laid them on the cutting board, covered them with Gladwrap, and pounded them with my rolling pin just a little.


Lemon Chicken, p 56
1 T chopped garlic
2 T plus 1 t olive oil, separated
3 c healthy chicken broth
2 T lemon juice
2 t water
2 t cornstarch
1/2 c carrot puree
2 egg whites
1 egg
1 c unbleached white flour
1/2 t salt
1 t garlic powder
6 chicken breasts

1. Saute chopped garlic in 1 t olive oil until it begins to turn golden brown. Add the broth, turn the heat to high, and reduce by half, about 8 minutes. Add the lemon juice.
2. In a small bowl, combine the water and cornstarch. Slowly stir the cornstarch mixture into the boiling broth. Add the carrot puree. Cover to keep warm and set aside.
3. Begin heating the 2 T olive oil over medium heat. Whisk the egg whites and egg in a shallow dish. Combine the flour, salt and garlic powder in a separate shallow dish. Dredge each cutlet into the dry ingredients and then dip in the eggs. Drop the cutlets directly into the heated skillet. Be careful that you don't splash oil on yourself. Ask me why I say that...Saute 4-5 minutes per side. Add the lemon sauce and cook 2-3 minutes more to combine flavors.

Broccoli Gratin
, p 114
1 bag frozen broccoli florets
1 T soft tub margarine spread
2 t flour
1 c skim milk
1/2 c reduced-fat cheddar cheese
1/2 c carrot puree
1/2 t salt
1/4 t pepper
2 T grated Parmesan

1. Preheat the oven to 400F. Bring medium saucepan of salted water to boil. Blanch for 2-3 minutes. Drain and set aside.
2. In the same saucepan, melt the margarine. Whisk in the flour and cook 1 minute over medium heat. Slowly whisk in the milk to prevent lumps from forming and bring to a boil. Cook 2-3 more minutes. Reduce the heat to low and add the cheddar, carrot puree, salt and pepper.
3. Add the broccoli to the cheese mixture and transfer to a glass baking dish. I used a glass pie dish. Top with Parmesan. Bake for 15 minutes until bubbly and the top browns.